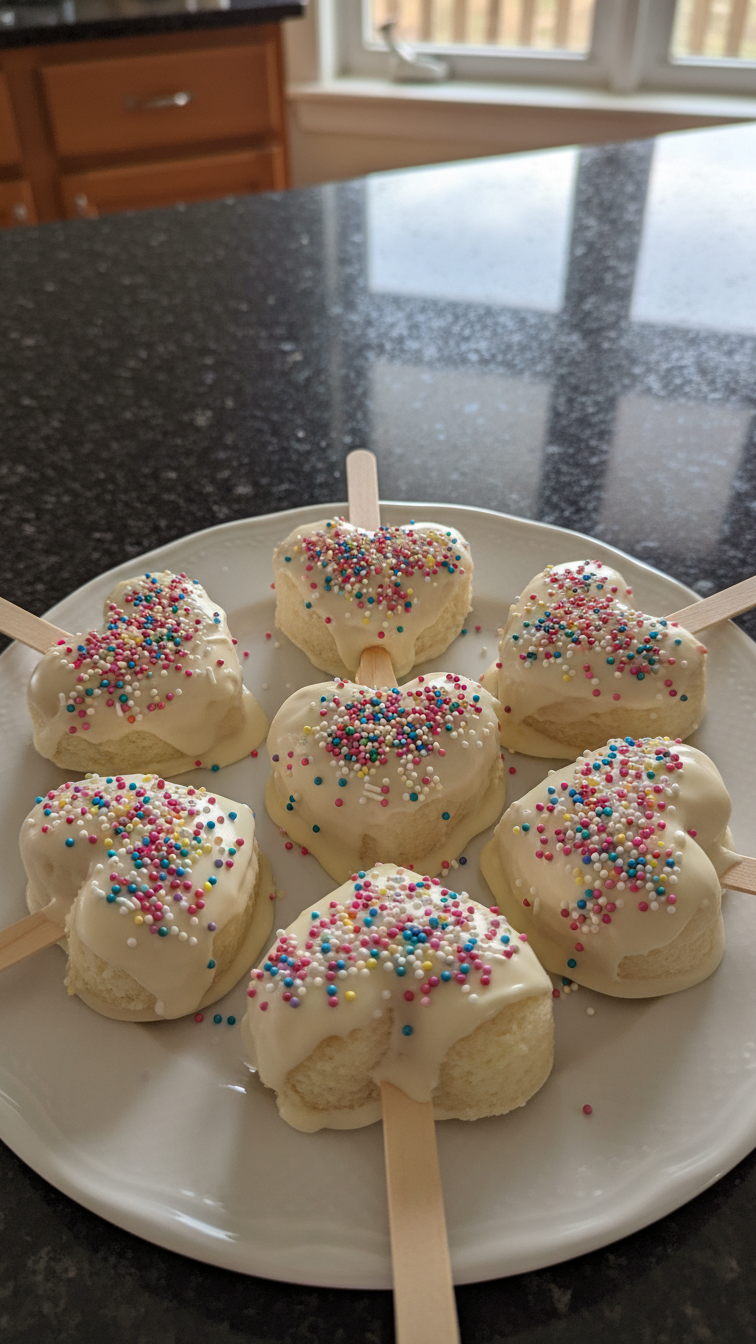
Heart-Shaped Vanilla Cake Pops
Highlighted under: Cozy Desserts
I’ve always loved making sweet treats for special occasions, and these heart-shaped vanilla cake pops are a delightful way to spread love. With a soft vanilla cake center coated in smooth chocolate and decorated to perfection, they are not only visually appealing but also irresistibly tasty. I enjoy making them with my family, as we can customize each pop together. They are perfect for Valentine's Day, anniversaries, or just a fun weekend baking project. Join me in creating these adorable and delicious treats!
When I first experimented with cake pops, I was astounded by how easy it was to turn leftover cake into something magical. I decided to craft them into heart shapes, which instantly elevated their charm. The moist vanilla center combined with a glossy chocolate coating has proven to be a showstopper at gatherings. I recommend using good quality chocolate for coating, as it makes a significant difference in taste.
What I love most about these cake pops is the personalization involved; using various sprinkles or edible glitter can transform each one into a unique work of art. My kids especially love getting involved with the decorating. It’s a wonderfully rewarding baking experience that brings smiles all around!
Why You'll Love These Cake Pops
- Adorable heart shape perfect for any celebration
- Deliciously moist vanilla cake with a rich chocolate coating
- Easy to customize with your favorite decorations and flavors
The Importance of Proper Mixing
When preparing the cake batter, proper mixing techniques are essential for achieving that light, fluffy texture. Begin by creaming the softened butter and sugar until they are pale and fluffy—this can take about 3-5 minutes with a hand mixer. The air incorporated at this stage contributes to the cake's overall lightness. Remember to scrape down the sides of the bowl to ensure all ingredients are well combined. This attention to detail can prevent dense or unevenly baked cake pops.
After you've incorporated the eggs and vanilla, it's crucial to alternate adding the dry ingredients with milk, starting and ending with the flour mixture. This helps maintain the batter’s structure and prevents overmixing, which can lead to tough cake pops. Mix until just combined; a few lumps are okay. Your goal is a smooth, pourable batter that will bake beautifully into soft, tender cake.
Perfecting the Crumble and Shaping
Once the cake has cooled completely, it's time to crumble it. I recommend using your hands to break the cake into small pieces, aiming for a consistent size to ensure even mixing with the frosting. If your cake is too dry and crumbles excessively, add more frosting gradually, testing the mixture. It should hold together without falling apart, similar to a moist cookie dough.
Shaping the heart cake pops can be a fun activity, especially when making them with kids. Use a heart-shaped cookie cutter or your hands to mold the cake mixture into hearts. Make sure the cake balls are compact and well-formed; if they are too loose, they may fall off the sticks after coating. Refrigerating them for 15-20 minutes before dipping can help solidify their shape, making the coating process much smoother.
Coating and Storing Your Cake Pops
For the chocolate coating, it's crucial to melt the chocolate slowly to avoid burning it. Using a microwave, heat the chocolate in 30-second intervals, stirring in between until it’s fully melted and smooth. Alternatively, using a double boiler allows for more controlled heating. A glossy, clean dip enhances both the appearance and the taste of your cake pops. Ensure that they are fully coated and tap off excess chocolate to prevent drips.
Once coated, place your cake pops in a styrofoam block to solidify in an upright position. If you want to prepare them in advance, these cake pops can be stored in an airtight container in the fridge for up to a week. For longer storage, consider freezing them before coating; they can last up to three months in the freezer. Just allow them to thaw in the fridge before dipping in chocolate for the best texture.
Ingredients
Gather the following ingredients to create your heart-shaped vanilla cake pops:
Cake Ingredients
- 1 ½ cups all-purpose flour
- 1 cup granulated sugar
- ½ cup unsalted butter, softened
- 2 large eggs
- 1 tablespoon vanilla extract
- 1 cup milk
- 1 ½ teaspoons baking powder
- ½ teaspoon salt
Coating and Decoration
- 12 ounces semi-sweet chocolate, melted
- Lollipop sticks
- Sprinkles or edible glitter (optional)
Now that you have all your ingredients, let's move on to the steps required to create these delicious cake pops!
Instructions
Follow these steps to make your heart-shaped vanilla cake pops:
Bake the Cake
Preheat your oven to 350°F (175°C). In a large bowl, cream together the softened butter and granulated sugar until light and fluffy. Beat in the eggs, one at a time, and then stir in the vanilla extract. In another bowl, combine the flour, baking powder, and salt. Gradually add the dry ingredients to the wet mixture, alternating with milk until the batter is smooth. Pour the batter into a greased heart-shaped baking pan and bake for 15-20 minutes, or until a toothpick inserted comes out clean.
Prepare Cake Pops
Allow the cake to cool completely. Once cool, crumble the cake into a large bowl. Use your hands to break apart any large pieces. Add a few tablespoons of frosting (store-bought or homemade) to the crumbled cake until it holds together well. Roll the mixture into bite-sized balls and shape them into hearts. Insert lollipop sticks into the top of each heart.
Coat the Cake Pops
Melt the semi-sweet chocolate in a microwave or double boiler. Dip each cake pop into the melted chocolate, allowing any excess to drip off. Decorate immediately with sprinkles or edible glitter before the chocolate sets. Place the cake pops upright in a styrofoam block or a glass to cool and harden.
Once set, your heart-shaped vanilla cake pops are ready to be enjoyed! They can be stored in an airtight container at room temperature for a few days.
Pro Tips
- For extra flavor, consider adding a splash of almond extract to the cake batter or using white chocolate for coating. These cake pops can also be made ahead of time and frozen before coating.
Serving Suggestions
These heart-shaped vanilla cake pops are versatile and can be served in various ways. Consider presenting them on a decorative stick, arranged in a mason jar or decorated foam block to make a charming centerpiece at parties. You could also package them in small cellophane bags tied with ribbons as sweet take-home gifts for guests.
For extra flair, try pairing your cake pops with a fruit dip or a drizzle of colored chocolate. The added textures and flavors can enhance the overall tasting experience, making them more enticing for both children and adults alike.
Variations and Customizations
Feel free to experiment with the flavor of the cake by adding ingredients like almond extract, lemon zest, or even cocoa powder to make a chocolate version. You can also swap the vanilla extract with flavored extracts like peppermint or hazelnut for a delightful twist.
Decorating the pops is an excellent opportunity for creativity. Use different types of sprinkles or nuts to add texture and color. For a more decadent treat, consider drizzling colored candy melts or white chocolate over the top for a visually appealing design.
Troubleshooting Common Issues
One common issue with cake pops is crumbling after dipping, which usually occurs if the cake balls are too dry. If this happens, make sure to adjust the amount of frosting until the mixture is moist enough to hold together. For future bakes, you can also try adding a little milk to the cake mixture to retain moisture better.
If your chocolate coating is too thick to dip easily, try adding a teaspoon of vegetable oil or shortening to thin it out. This will help create a smooth and even coating over the pops. Just ensure not to overheat the chocolate to avoid a gritty texture.
Questions About Recipes
→ Can I use a different flavor of cake?
Absolutely! You can substitute the vanilla cake with flavors like chocolate, red velvet, or even lemon.
→ How long do the cake pops last?
Cake pops can be stored in an airtight container at room temperature for up to 5 days.
→ Can I make these gluten-free?
Yes, by using a gluten-free flour blend, you can easily adapt this recipe for a gluten-free option.
→ What can I use instead of lollipop sticks?
You can use pretzel sticks or even sturdy straws as a fun alternative!
Heart-Shaped Vanilla Cake Pops
Created by: The Treatfulkitchen Team
Recipe Type: Cozy Desserts
Skill Level: Intermediate
Final Quantity: 20 pops
What You'll Need
Cake Ingredients
- 1 ½ cups all-purpose flour
- 1 cup granulated sugar
- ½ cup unsalted butter, softened
- 2 large eggs
- 1 tablespoon vanilla extract
- 1 cup milk
- 1 ½ teaspoons baking powder
- ½ teaspoon salt
Coating and Decoration
- 12 ounces semi-sweet chocolate, melted
- Lollipop sticks
- Sprinkles or edible glitter (optional)
How-To Steps
Preheat your oven to 350°F (175°C). In a large bowl, cream together the softened butter and granulated sugar until light and fluffy. Beat in the eggs, one at a time, and then stir in the vanilla extract. In another bowl, combine the flour, baking powder, and salt. Gradually add the dry ingredients to the wet mixture, alternating with milk until the batter is smooth. Pour the batter into a greased heart-shaped baking pan and bake for 15-20 minutes, or until a toothpick inserted comes out clean.
Allow the cake to cool completely. Once cool, crumble the cake into a large bowl. Use your hands to break apart any large pieces. Add a few tablespoons of frosting (store-bought or homemade) to the crumbled cake until it holds together well. Roll the mixture into bite-sized balls and shape them into hearts. Insert lollipop sticks into the top of each heart.
Melt the semi-sweet chocolate in a microwave or double boiler. Dip each cake pop into the melted chocolate, allowing any excess to drip off. Decorate immediately with sprinkles or edible glitter before the chocolate sets. Place the cake pops upright in a styrofoam block or a glass to cool and harden.
Extra Tips
- For extra flavor, consider adding a splash of almond extract to the cake batter or using white chocolate for coating. These cake pops can also be made ahead of time and frozen before coating.
Nutritional Breakdown (Per Serving)
- Calories: 100 kcal
- Total Fat: 6g
- Saturated Fat: 3.5g
- Cholesterol: 20mg
- Sodium: 50mg
- Total Carbohydrates: 12g
- Dietary Fiber: 0g
- Sugars: 8g
- Protein: 1g