Steak and Cheese Sliders
Highlighted under: Easy Plates
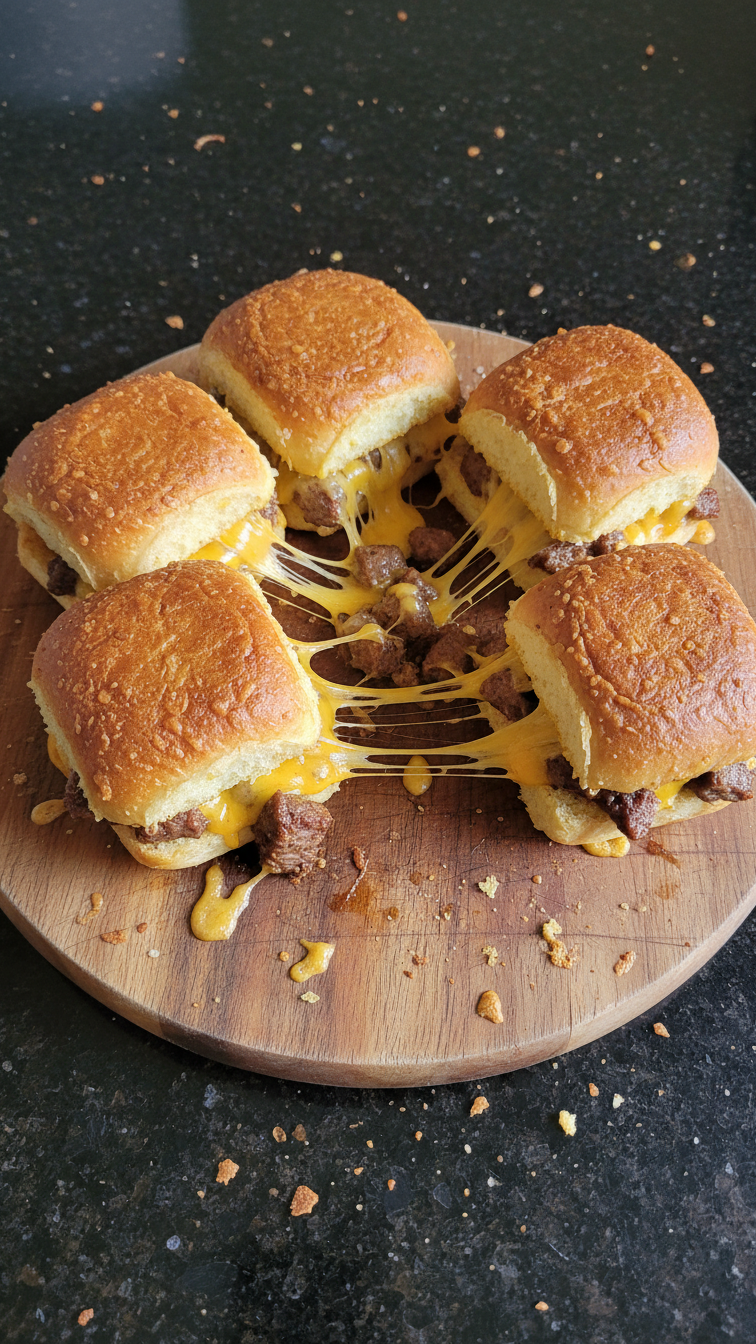
I absolutely adore these Steak and Cheese Sliders! They’re the perfect blend of juicy steak, melted cheese, and soft buns, making them a hit at any gathering. I love how simple they are to prepare yet incredibly satisfying. The first time I made them, friends couldn’t get enough, and I ended up sharing the recipe on repeat. These sliders are great for game nights or casual get-togethers. Plus, they come together in under an hour, making them a fantastic option for busy weeknights as well.
When I first experimented with Steak and Cheese Sliders, my goal was to recreate a classic that everyone would love. It was a bit daunting at first, but once I found the right balance of spices and learned how to perfectly sear the steak, it turned out to be an easier task than I expected. The trick is to let the meat rest before slicing, ensuring every bite is juicy and tender.
What really elevates these sliders is the choice of cheese. I went with a blend of provolone and cheddar for a rich flavor and melty texture that complements the steak beautifully. Using fresh, soft slider buns is key too; they soak up the flavors and keep everything together without falling apart. This recipe has become a go-to in my house!
Why You'll Love These Sliders
- Juicy, perfectly seasoned steak that melts in your mouth
- Melted cheese that stretches deliciously with every bite
- Quick and easy to prepare, perfect for any occasion
- Customizable with your favorite toppings and sauces
Perfecting Your Steak
Selecting the right cut of steak is crucial. Flank steak is a fantastic choice for sliders due to its rich flavor and excellent texture. Always choose a cut that has a good amount of marbling; this helps to keep the steak moist during the cooking process. When you're searing the steak, ensure your skillet is hot enough to achieve a nice crust. This caramelization not only enhances the flavor but also adds intriguing textures to the finished slider.
Resting the steak after cooking is often overlooked but essential. Allowing it to rest for about 5-10 minutes before slicing helps redistribute the juices, preventing them from spilling out when cut. Slice against the grain for tender pieces that are easier to bite into. This technique will elevate the overall eating experience, ensuring each slider is packed with flavor and easy to enjoy without falling apart.
Crafting the Cheese Meltdown
The choice of cheese significantly impacts the flavor profile of your sliders. Provolone and cheddar are fantastic together, as provolone melts beautifully, creating that gooey texture while cheddar adds a sharp tang. If you're feeling adventurous, try incorporating a blend of cheeses, such as Gruyère for nuttiness or Monterey Jack for creaminess. Each addition can personalize your sliders and make them uniquely yours.
Baking the assembled sliders in the oven not only melts the cheese but also toasts the buns, making them perfectly golden brown. Keep an eye on them while they bake, as the baking time can vary based on your oven. You'll know they're ready when the cheese is bubbling and the buns have developed a light crispness. For an extra touch, brush the top of the buns with melted butter before baking to enhance the flavor and texture.
Serving and Storage Tips
These sliders are wonderfully versatile, and you can customize them with a range of toppings. Add sliced pickles or jalapeños for a tangy crunch, or try a drizzle of sriracha for a spicy kick. You can also serve them with a side of homemade dipping sauce, like creamy ranch or tangy barbecue, to elevate the party experience. Presentation matters; arranging the sliders on a platter can make them a striking centerpiece.
If you have leftovers, store them in an airtight container in the fridge; they’ll keep well for up to three days. Reheat them in a microwave or a toaster oven to regain that delightful crunch and melty cheese. If you're considering making them ahead of time, you can assemble the sliders and keep them unbaked in the fridge for a few hours. Just pop them in the oven when your guests arrive for fresh, warm sliders every time.
Ingredients
Gather these ingredients to get started!
Ingredients for Steak and Cheese Sliders
- 1 pound flank steak
- 12 slider buns
- 1 cup provolone cheese, shredded
- 1 cup cheddar cheese, shredded
- 1 medium onion, thinly sliced
- 2 tablespoons olive oil
- Salt and pepper to taste
- 1 tablespoon Worcestershire sauce
- Optional toppings: pickles, jalapeños, or your favorite sauce
Make sure to prepare all your ingredients before starting!
Instructions
Follow these simple steps to create your sliders:
Cook the Steak
Heat the olive oil in a skillet over medium-high heat. Season the flank steak with salt and pepper, then sear it for about 4-5 minutes on each side, or until it reaches your desired doneness. Remove from heat and let it rest before slicing thinly.
Prepare the Onions
In the same skillet, add the thinly sliced onions and sauté until they are caramelized and golden, about 6-8 minutes.
Assemble the Sliders
Preheat your oven to 350°F (175°C). On the bottom half of each slider bun, layer sliced steak, caramelized onions, and a generous amount of cheese. Place the top half of the buns on each slider.
Bake the Sliders
Place the assembled sliders on a baking sheet and bake for 10-15 minutes, or until the cheese has melted and the buns are golden brown.
Serve warm with your favorite condiments!
Pro Tips
- For extra flavor, try adding some garlic powder or paprika to the steak before cooking. Don’t hesitate to experiment with different cheeses or add toppings to customize your sliders!
Ingredient Substitutions
In this recipe, flank steak can be substituted with other cuts like sirloin or ribeye if you prefer. These cuts will still provide a juicy and flavorful outcome, but be mindful of their cooking times; they may cook slightly faster compared to flank steak. If you're looking for a leaner option, chicken breast or turkey can be used as alternatives, but you'll need to adjust your cooking time to avoid drying them out.
For the cheese, if you have dietary restrictions or simply prefer something different, swap out provolone and cheddar for dairy-free alternatives that melt well, such as cashew cheese or soy-based cheeses. These options will ensure everyone can partake without sacrificing the cheesy goodness that makes these sliders irresistible.
Scaling the Recipe
Scaling up for a larger gathering? It's easy! Just widen your equation: for every 12 sliders, add 1 pound of steak and adjust the amount of cheese and buns accordingly. When cooking, consider using a larger skillet or multiple skillets to ensure even cooking times. If you have to prepare a large batch, consider using the oven method for more even heat distribution when caramelizing the onions and baking the sliders.
For smaller gatherings, you can easily halve the quantities. This recipe is flexible, maintaining its deliciousness no matter how you adjust it. Just be sure to keep an eye on cooking times, particularly the steaks, as smaller portions may cook quicker than larger ones.
Questions About Recipes
→ Can I use a different cut of meat?
Absolutely! You can substitute flank steak with sirloin or ribeye for a different flavor and tenderness.
→ How do I store leftover sliders?
Store leftover sliders in an airtight container in the fridge for up to 3 days. Reheat in the oven for best results.
→ Can I prepare the sliders ahead of time?
Yes, you can assemble the sliders, cover them, and refrigerate until you’re ready to bake. Just add a few extra minutes to the baking time if they’re cold.
→ What toppings do you recommend?
I recommend pickles, jalapeños, or even a drizzle of spicy aioli for an extra kick!
Steak and Cheese Sliders
Created by: The Treatfulkitchen Team
Recipe Type: Easy Plates
Skill Level: Intermediate
Final Quantity: 12 sliders
What You'll Need
Ingredients for Steak and Cheese Sliders
- 1 pound flank steak
- 12 slider buns
- 1 cup provolone cheese, shredded
- 1 cup cheddar cheese, shredded
- 1 medium onion, thinly sliced
- 2 tablespoons olive oil
- Salt and pepper to taste
- 1 tablespoon Worcestershire sauce
- Optional toppings: pickles, jalapeños, or your favorite sauce
How-To Steps
Heat the olive oil in a skillet over medium-high heat. Season the flank steak with salt and pepper, then sear it for about 4-5 minutes on each side, or until it reaches your desired doneness. Remove from heat and let it rest before slicing thinly.
In the same skillet, add the thinly sliced onions and sauté until they are caramelized and golden, about 6-8 minutes.
Preheat your oven to 350°F (175°C). On the bottom half of each slider bun, layer sliced steak, caramelized onions, and a generous amount of cheese. Place the top half of the buns on each slider.
Place the assembled sliders on a baking sheet and bake for 10-15 minutes, or until the cheese has melted and the buns are golden brown.
Extra Tips
- For extra flavor, try adding some garlic powder or paprika to the steak before cooking. Don’t hesitate to experiment with different cheeses or add toppings to customize your sliders!
Nutritional Breakdown (Per Serving)
- Calories: 320 kcal
- Total Fat: 18g
- Saturated Fat: 8g
- Cholesterol: 60mg
- Sodium: 720mg
- Total Carbohydrates: 28g
- Dietary Fiber: 1g
- Sugars: 2g
- Protein: 18g